
ArcGIS claims to have seamless integration between CAD and GIS. However, this integration can be very confusing if your CAD floor plans are not georeferenced already. Furthermore, the Georefencing toolbar in ArcGIS can be very time consuming to manually shift, rotate, and scale each floor plan one-by-one. This post will look at an efficient way to georeference floor plans by building using the AutoCAD World File tool.
First, you would need to download the AutoCAD World File from this link. This tool contains a .LSP script that will assign a world file to each .dwg file. A world file contains the locations reference points in order for the GIS software to know where to place each floor plan when it is brought into the GIS software.
Step One: Export a shapefile to CAD
Right click on the shapefile of the buildings that contain the floor plans and select Data-> Export to CAD. Next, export that shapefile in the DWG2013 format. Leave the selection and seed file as they are.
Step Two: Open the shapefile CAD
To do this, just open the .dwg file in the folder that it was saved in. Once you open this file, you will notice it looks just like it would in GIS. Furthermore, the coordinates are included at the bottom of the document showing that you are now working in a georeferenced plane.
Step Three: Add the Floor Plan
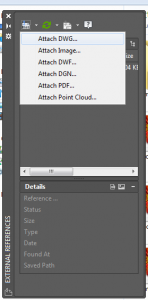
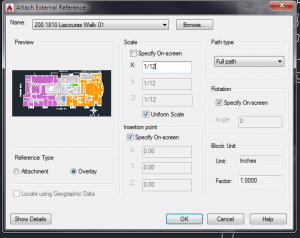
Type the command XREF in the bottom command bar and hit enter. This will open a file reference box. Open the drop-down menu under the DWG icon and select DWG. Navigate to a floor plan you want to add and select it. In the following window, under Scale de-select “Specify on Screen” and select Uniform Scale. Enter 1/12 in the X box in order to convert feet to inches to scale the floor plans correctly. Select “Specify On Screen” for Insertion Point and Rotation and leave Reference Type as “Overlay”. Click OK.
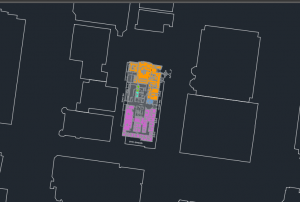
Select the point of insertion and rotation angle in order to place the floor plan. Don’t worry if it isn’t exact because you can adjust it quite easily.
Step Four: Align Floor Plan
In order to adjust the floor plan so it aligns with the building footprint, type the command ALIGN in the command box. Select your floor plan and hit enter. Next, you will be instructed to select a minimum of two reference points. Match up opposite corners of the floor plan to the building foot print. I suggest you use more than two reference points to accomplish this. You can do the ALIGN operation as many times as needed to get the floor plan precisely aligned to the footprint.
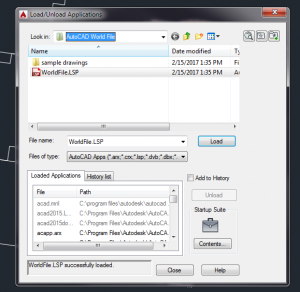
Step Five: Activate the AutoCAD World File App
Type APPLOAD command into the command bar and locate the AutoCAD World File folder. Select the WorldFile.LSP file and hit Load. Wait for the box on the bottom to say “World File Loaded Successfully” and then hit close.
Step Six: Using the Tool to Create a World File
Type CREATEWORLDFILE command in the command bar and hit enter. Select the floor plan (not the footprint!). A Save File box will open with a file name esri_cad.wld. Locate the folder that contains all the buildings floor plans and hit save. Do not change the name of the .wld file.
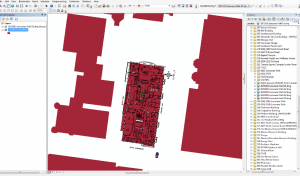
Step Seven: Open the CAD Drawing in ArcGIS
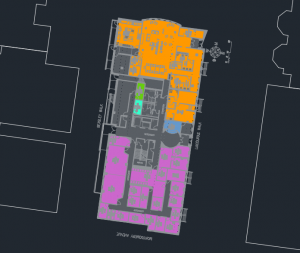
Open the same shapefile you used in this demo in ArcGIS. Use the Catalog to navigate to where the building floor plans you just created a world file for is located. Drag the floor plan file into the GIS window. Now, the floor plan should drop right on top of the building footprint.
Notes:
This demo should work for all floor plans for the building. However, in many buildings floors are not always the same size so the georeferencing may need to be tweaked to fit the footprint accurately. Use the Georeferencing toolbar in ArcGIS to fix this.
CAD files can be pretty messy to work with in GIS, so I suggest only turning on the layers you actually need. This can be accomplished by right clicking on each layer in the group and selecting Properties. Next, select the drawing layers tab to turn off the layers you do not need to make the file easier to use. You can then convert this to a Layer or Feature Dataset or export it as a shapefile to make it even easier to use.
A youtube tutorial on using the AutoCAD World File tool is here.