What’s New in Zoom?

Denise Hardiman

As you are aware Zoom regularly delivers new versions to fix bugs and release new features. In order to stay up to date it is important that you check for and install updates on a regular basis. Personally, I check for updates at least once a week. To check for updates you can go to the Zoom program on your computer, click your profile picture in the upper right corner of the window that appears, and select “Check for Updates” from the drop-down menu. Keeping your Zoom up to date ensures that you have the best audio and video experience possible.

Let’s take a look at some of the more recent enhancements!

Blur My Background

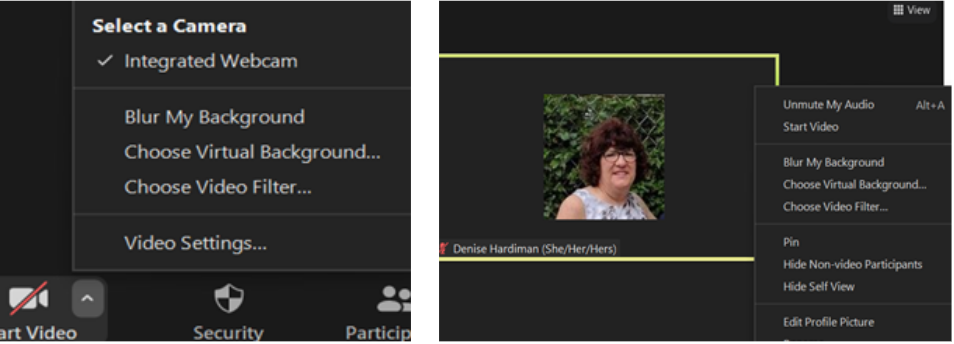
Did you ever turn on your camera to start a class session and notice that the background is a bit messy or that you forgot to set a virtual background?  Well Blur My Background is now a one-click feature. You can quickly blur your backgrounds, without needing to go to your Zoom client settings. The Blur My Background option is available from the start/stop video menu in the main toolbar, the 3-dot menu on the user’s video tile, and by clicking anywhere on your video image.

Add video to waiting room

No one enjoys sitting in a Zoom waiting room anticipating a meeting to start.  Why not give your participants something to view. You can add a video to your waiting room in the web portal. Participants in the Waiting Room are able to view the video while they wait for you to allow them into the meeting. This might be a good feature to consider if you are using Zoom for office or student hours. You will still have the ability to use the default screen or a logo/description. More detailed information about the waiting room feature is available from Zoom Support.

Save custom gallery view order

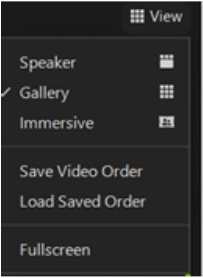
Are you frustrated with your students’ profiles not being in the same place for every class meeting?  It is hard to get to know them and remember their names. Now you can save the customized gallery view order for use in later class sessions that are part of a series of recurring meetings. In the future session, that custom gallery view order can be reloaded and participants’ videos will be arranged in the custom order, with any new participants appearing in the bottom-right corner. The custom gallery view will be saved and be available for other meetings in this series. Note that only one custom gallery view order can be saved for each meeting series.

Zoom Focus Mode

While teaching via Zoom have you ever felt that your students were paying more attention to other students than they are paying to you? Focus Mode is for you! This feature keeps students focused by only showing them their video and your (the host) video, which will help students to stay attentive or work on their tasks without being distracted by others and their tasks. This feature gives you (and your co-hosts) a view of all students’ videos without students seeing each other.

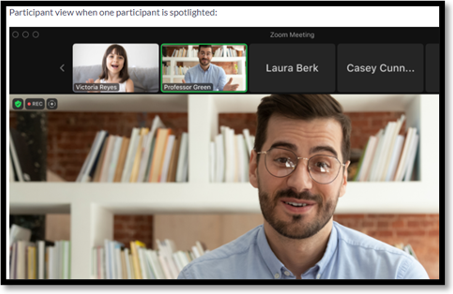
Once Focus Mode has been started, participants in focus mode will only see the video of the host, co-hosts, any participants spotlighted by the host, and their own video. Participants shared screens will be visible to the hosts and co-hosts but audio will be heard by all participants in the room. The Focus Mode basically reduces the visual stimulation.

If you need further assistance or just want to try out some of the features with someone else, please visit our labs at the following locations

  • Virtual Ed Tech lab (on Zoom)
  • Main Campus (Tech Center, Suite 112)
  • Health Sciences (Student Faculty Center, 2nd Floor)

The virtual and main campus labs are open Monday to Friday 8:30am to 5:00pm, and the HSC lab is open Monday, Wednesday, Thursday and Friday from 8:30am – 5:00pm. To schedule a one-on-one appointment with an Educational Technology Specialist or a Faculty Developer visit our CATbooking page.

Denise Hardiman serves as Educational Technology Specialist at Temple’s Center for the Advancement of Teaching.

What New in Zoom for the Spring 2022 Semester?

Ariel Siegelman

With the start of a new semester, it’s always a good practice to check out the new features that Zoom has added over the last few months! You never know what new tools are now available that will make your online synchronous teaching more seamless–and more creative!–than ever before. Below are the CAT’s favorite new features that were added during the fall semester.

As always, you’ll want to make sure that you have the most up-to-date version of Zoom, otherwise these features may be unavailable. To do so, you can go to the Zoom program on your computer, click your profile picture in the upper right corner of the window that appears, and select “Check for Updates” from the drop-down menu.

Automatic updates

On the note of keeping Zoom up-to-date, there is now a feature that you can turn on to ensure that the Zoom program on your computer automatically stays updated. You can choose between two different update frequency settings: The “Fast” option will update Zoom every time there are new updates, which will allow you to be on the cutting edge of all of Zoom’s new features. The “Slow” option will update Zoom less frequently, which will allow you to become more comfortable with Zoom’s existing features, and Zoom will provide its new features to you at a slower pace. To apply this setting, go to the Zoom program on your computer, click your profile picture in the upper right corner, select “Settings” from the drop-down menu, and locate the “Zoom Updates” option in the window that appears.
 

Presentation slide control

If you use Google Slides, Powerpoint, or Keynote to present slideshows while sharing your screen, you can now turn on a setting that will allow you to give other participants in the meeting permission to control the progression of the slides. This is especially useful if you often co-present slideshows with another instructor or TA, as now all presenters will be able to progress through the slideshow instead of the person screensharing being the only one who can do so. To learn more about enabling and using this feature, visit the following Zoom support guide: Controlling slides shared by another participant.
 

New quiz question types for polling

Zoom has added new question types for polls! Previously, only single choice and multiple answer questions were available, but Zoom’s question types now also include matching, rank answers, fill in the blank, short and long answer questions, and rating scale. You are also now able to embed images into your poll questions, and Zoom will automatically record all responses from your participants. To learn more about these advanced polling features, visit the following Zoom support guide: Advanced polling and quizzing for meetings.

Poll editing access for alternative hosts

On the note of polling, any alternative hosts that have been assigned to a meeting can now add or edit polls. This is very useful if you would like a TA or co-instructor to manage the polls during your live class. An alternative host in a meeting will now see the additional in-meeting options to add or edit a poll, which will open the poll settings on the temple.zoom.us website to make any changes.

Two-way chat with Waiting Room participants

When you are the host of a meeting and have the Waiting Room enabled, you and any co-hosts can now exchange messages with participants in the Waiting Room! This is incredibly helpful for letting the Waiting Room participants know their estimated waiting time, to give them any information they need to prepare for your meeting, and for the participants to send you any necessary information while they’re waiting. You can send messages to all participants in the Waiting Room or just individual participants. Additionally, only the host and any co-hosts will be able to see responses from those in the Waiting Room. You can enable this feature in the Settings of your account when you log into temple.zoom.us.
 

Create, remove, and rename breakout rooms while they are open

In the past, if you wanted to modify any existing breakout rooms, you would have to close all of the breakout rooms in order to make any changes. Now, you no longer need to close the breakout rooms in order to rename, add, or remove rooms. You can perform these actions while breakout rooms are currently open and in use. Note that in order to do this, all of the participants in the Zoom meeting need to have the most up-to-date version of Zoom.
 

Schedule meetings with Focus mode

One of our favorite new features from last semester was Focus Mode! Focus Mode allows only hosts to see participants’ videos and screenshares and easily switch between different participants. Additionally, they can choose specific co-hosts and participants to also see these screenshares if they wish. This means that you can require students to be sharing their screens simultaneously while taking an exam, and you and any co-hosts can review each student’s screen, without the students seeing each other’s screens. This is also useful if a student wants to share or troubleshoot something on their computer privately with you, without sharing their screen with the entire class. Now you can schedule a meeting with Focus mode to start automatically when the meeting begins instead of having to enable it once you’re in a meeting.
 

Profile photos for in-meeting chat

Finally, the chat feature in Zoom meetings now displays all participants’ profile pictures next to their messages. If a participant has not uploaded a profile picture, the participant’s initials will appear instead. This will help you and your students put faces to names while interacting with the chat, further humanizing your Zoom meeting, especially if any students have their cameras off.

To learn more about how to use these features, you can visit our in-person Educational Technology Labs, our Virtual EdTech Drop-in Lab, or book a consultation with an Educational Technology Specialist. Information and links to these services are available at catbooking.temple.edu.

Have a great spring semester!

Ariel Siegelman is Manager of Learning Engagement at Harrisburg University of Science and Technology.

Making the Most of Classroom Polling

H. Naomie Nyanungo

Polling tools, sometimes referred to as classroom or student response systems, are great for engaging students in virtual or face-to-face learning environments. Polling tools such as Poll EverywhereVevoxMentimeter and others can help faculty to assess how well students are grasping new concepts. Used effectively, classroom polling activities can create opportunities for students to provide feedback, pose questions and share reflections during class. Teachers also use classroom polls to facilitate collaborative learning. In this blog, we share strategies for effectively using classroom polling activities to enhance active learning and student engagement.

  • Plan for execution and follow-up: It is important to have a plan for what happens before and after each polling activity. The plan should include details on what will happen (e.g., lecture, class activity) before the poll is administered, how student poll responses will be used (e.g., to identify learning gaps), and if student participation will be graded. Also think about how you will follow up (e.g. give feedback or address questions) and integrate the polling activity with other activities in the classes.
  • Communicate with students: It is a good idea to communicate the purpose and plan for classroom polling to students so that they understand how this is contributing to their learning. Articulate expectations for participation in polling activities. Doing a few practice polling activities is a good way to get everyone familiar with the tool and process. Be sure to check if all your students have access to the technology required to participate, and offer alternative ways for participation for those that may not have access. 
  • Consider your learning goals when writing questions: Polling can be used to achieve a variety of learning goals, such as recall of foundational concepts or application of concepts. It is good practice to write polling questions that support specific learning goals. Types of polling questions include those that ask students about content, application, individual perspective and progress on specific learning activities. You can read more about different types of polling questions targeting different learning goals.
  • Vary the types of polling activities: Take advantage of the versatility of polling tools by using different polling activities throughout the semester. This will go a long way toward sustaining student engagement and avoid monotony. There is a wide range of polling activities to pick from such as active lecturing, peer instruction, group work, and learning assessments. Look through this list of descriptions and examples of polling activities for inspiration. Feel free to adapt these activities to your specific context.

We hope that these strategies will help you to effectively use polling to increase student understanding and engagement with you, their peers and course content. Should you need any support, the team of consultants at the CAT is here to help. Please visit our website to book an appointment with a consultant or visit our virtual and on-site educational technology labs.

Happy polling!

References

H. Naomie Nyanungo is Director of Educational Technology at Temple University’s Center for the Advancement of Teaching.

What’s New in Zoom?

Ariel Siegelman

As we get closer to the beginning of the semester, you may be wondering if there are any new Zoom features that you can use in order to provide a smoother and more engaging online learning experience for your students. Over the past several months, Zoom released some great new features that you can use right away as you dive into teaching your fall courses!

Before you go into Zoom and test out these new features, make sure that you have the most up-to-date version of Zoom, otherwise these features may be unavailable. To do so, you can go to the Zoom program on your computer, click your profile picture in the upper right corner of the window that appears, and select “Check for Updates” from the drop-down menu.

Here are nine of our favorite new Zoom features:

1. Share screen to all Breakout Rooms

If you’ve ever facilitated a breakout room activity where you’ve all had students evaluating the same questions or content, you may have wished that you could share your screen to the breakout rooms while they are in session. Now you can! While the breakout rooms are open, clicking the Share Screen button in Zoom will give you a “Share to breakout rooms” option. You can use this feature to share multimedia or a common list of questions for students to discuss. Note that sharing your screen will interrupt any student screenshares in the breakout rooms.

2. Focus Mode

For instructors who facilitate and proctor quizzes and exams on Zoom, this new feature is an absolute godsend! Enabling Focus Mode will allow only hosts to see participants’ videos and screenshares, and the host can easily switch between different participants. Additionally, they can choose specific co-hosts and participants to also see these screenshares if they wish. This means that instructors can require students to be sharing their screens simultaneously while taking an exam, and then the host can review each student’s screen, without the students seeing each other’s screens. This is also useful if a student wants to share or troubleshoot something on their computer privately with the instructor, without sharing their screen with the entire class. In order to use Focus Mode in a Zoom meeting, you first must go to https://temple.zoom.us/profile/setting and turn on Focus Mode.

3. New annotation tool: Vanishing Pen

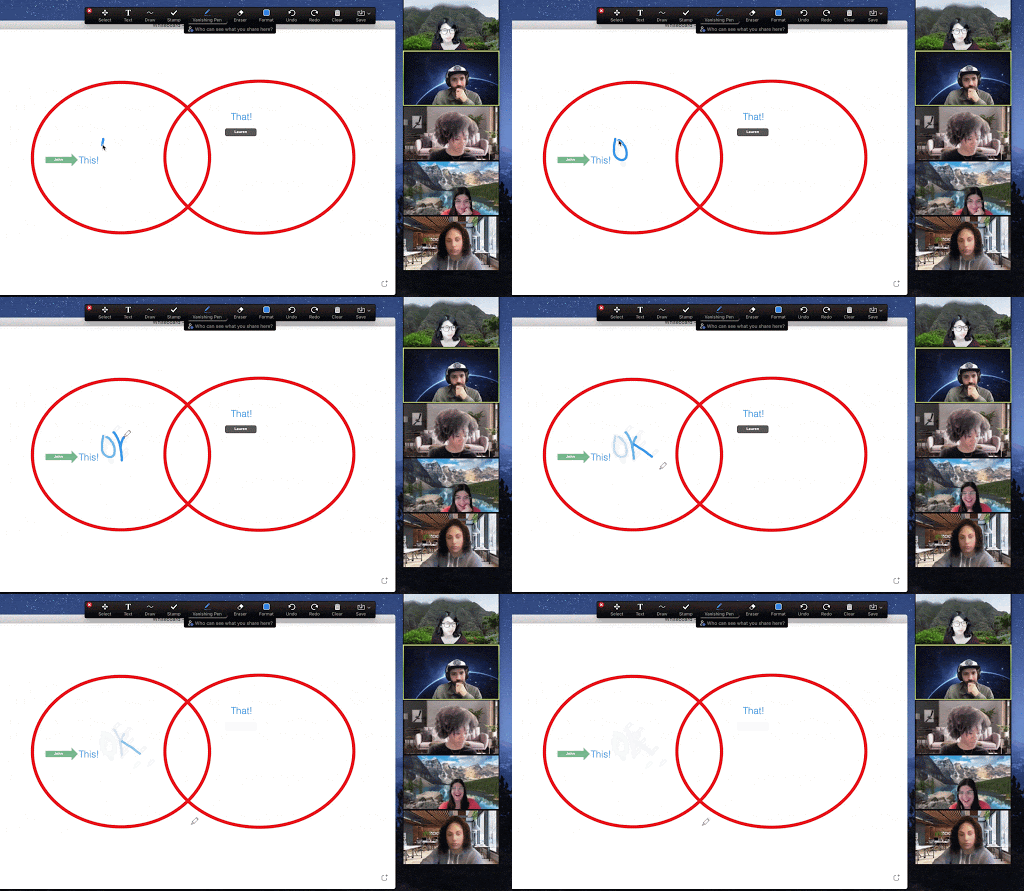
This new feature in the Annotation toolbar, which appears when screensharing or using the Whiteboard, allows hosts and participants to use a pen tool whose drawings slowly vanish. This is helpful if you only want to circle or underline something temporarily–instead of having to erase the marking, it will slowly disappear after a few seconds. You can activate the Vanishing Pen by clicking on the Spotlight button in the Annotation toolbar, and then selecting Vanishing Pen.

4. Share and play video files directly into meeting

This feature, located in the Advanced tab of the Share Screen window, allows you to directly choose a video file from your computer to play through screensharing. Instead of having to share your desktop and bring up the file, or share a specific video playback program, the video file will play directly in Zoom for all meeting participants to watch.

5. Full emoji suite & “away” coffee cup for Reactions

If you click on the Reactions button in Zoom, you’ll notice that you have a full array of emojis to choose from in order to express your emotions! When an emoji or icon is selected, it will appear in the corner of your video, as well as next to your name in the Participants window. These Reactions will remain active until you decide to turn them off. Additionally, you will also find the coffee cup icon, which will display an “away” status for you. You and your students can use this coffee cup to include when you’ve stepped away from the computer for a moment.

6. Request Live Transcription enablement as participant

A new feature that Zoom added last year was live speech-to-text transcription, which when enabled by the host, participants can turn on in order to view live generated subtitles of the meeting’s audio. Participants can now click a button to request for the live transcription to be turned on. The host will be notified of this request and then be presented with a button that allows them to enable the transcription immediately. These features are all located in the Live Transcript button in a Zoom meeting. Consider enabling the Live Transcript in order to make your Zoom classes more accessible!

7. Immersive View

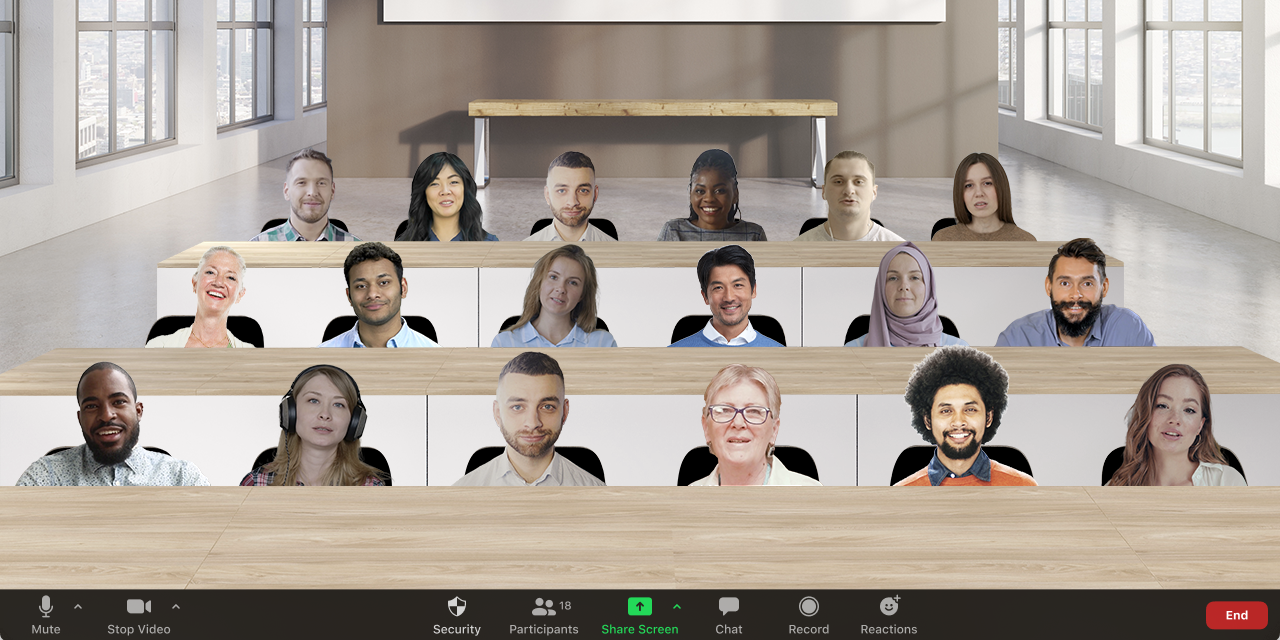
Wish a Zoom meeting felt more like a classroom? Immersive View was designed to do just that: Present a virtual space that feels more like everyone is sitting together in-person. To enable Immersive View as the host, click the View icon in the upper right corner of a Zoom meeting, and then click “Immersive View.” You’ll be presented with several options for virtual immersive “rooms” for up to 25 participants.

8. Mute and Video Off when joining a recorded/live streamed Meeting

When participants join a meeting that is currently being recorded or livestreamed, they will be notified, and their audio and video will automatically be turned off. This will allow them to fully opt into being recorded or not, without their face or voice accidentally being recorded if they do not consent to it.

9. Post-meeting survey

Finally, hosts now have the ability to have Zoom prompt participants to take a survey after they leave a Zoom meeting, including through third-party survey tools such as Canvas surveys or SurveyMonkey. After students leave a Zoom meeting, the survey will automatically load in their browser. Hosts can then review the survey results via the Reports feature at https://temple.zoom.us/account/report or through the third-party website. This is a great opportunity to ask students about their experience in your Zoom class and use their feedback to continuously improve as an online instructor. It’s also a great way to facilitate end-of-class active learning activities, such as the Exit Ticket, where students are prompted to provide any questions they currently have about the course, or to answer a series of short questions checking their understanding of the day’s content. To apply a post-meeting survey for a Zoom meeting, you first must go to https://temple.zoom.us/profile/setting and turn on Meeting Survey. Then, after scheduling a Zoom meeting, the Survey feature will be available at the bottom of the meeting confirmation page.

To learn more about how to use these features, you can visit our in-person Educational Technology Labs, our Virtual EdTech Drop-in Lab, or book a consultation with an Educational Technology Specialist. Information and links to these services are available at catbooking.temple.edu.
Happy Zooming!

Ariel Siegelman is Senior Educational Technology Specialist at Temple University’s Center for the Advancement of Teaching.

Using Proctorio Thoughtfully

Hleziphi (Naomie) Nyanungo and Jeff Rients

As we continue to tackle the ongoing challenges of teaching remotely, one of the sticking points in some online classrooms is the use of AI proctoring solutions such as Proctorio to maintain academic integrity. While preventing cheating in online, closed-book tests is a challenge, students, faculty and technology experts have pointed to practical and ethical issues with this type of solution. Students on a number of campuses have objected to the use of this software and some universities, such as University of Illinois Champaign, University of British Columbia, and California Berkeley, have banned use of the tool.

What are the concerns?

Commonly cited concerns include:

  • Privacy – The electronic surveillance of their homes and the encoding of location information can make some students feel vulnerable, and critics have questioned how secure the data collected is. Where does this data go? How long is it retained? Who has access to it?
  • Anxiety – Test performance tends to go down as anxiety levels go up and for some students simply knowing they are being electronically scrutinized increases their anxiety level. Students may also worry that they will inadvertently do something (talk to themselves while taking an exam, for instance) that will flag them as cheaters.This creates a situation where the effort expended to catch cheaters actually penalizes some of the students acting in good faith.
  • Technology Access: Proctoring solutions work on the assumption that all students have access to the technological tools needed to participate, including a stable wifi connection, a laptop or desktop computer, and and a working webcam (and a quiet space in which to work, free from activity that might set off flags in the system).
  • Equity – Algorithm-driven proctoring solutions treat some students whose bodies do not conform to an ideal as inherently suspicious. The tool has had difficulty recognizing students with darker skin tones, for example, and the normal movements associated with certain motor neuron diseases can be read as suspicious behavior.

What Can I Do to Address These Concerns?

So given that there are  legitimate concerns about the use of this software, how should we as instructors respond to them? As with so many pedagogical issues, there is no one-size-fits-all solution. Instead, we’d like to suggest a range of possible moves you can make:

  • Review your use of Proctorio – Perhaps the settings (there are lots of options!) don’t need to be as stringent as the defaults. Apply an ethic of minimal invasiveness to your use of this tool. Consider not using a room scan before beginning the test to reduce privacy concerns. If you do use room scans before the exam, definitely do not interrupt an exam to do an additional room scan later in the exam period.
  • Talk to your students – Make sure you have a clearly articulated policy as to what constitutes cheating. Talk to your students also about the importance of academic honesty. Research shows that a timely reminder urging academic honesty works! Reassure the students that any activity flagged by the algorithm as suspicious will be individually reviewed by you before any action is taken.
  • Offer another assessment option – Many instructors already offer alternative assessments to students when they can’t be at a scheduled examination or when other exigencies arise. Consider making another assessment available to students who object to the use of online proctoring.
  • Review the Proctorio report carefully – if you are using Proctorio simply as a deterrent but never reviewing the reports that the tool provides, you are misusing the tool and should look for a different method to manage assessments. Please review the reports carefully before making decisions about whether students are cheating in your class as students are often flagged for behavior that does not constitute cheating.
  • Reexamine your assessment plan – In last year’s transition to emergency remote teaching, many instructors found the easiest path to success was to simply recreate their usual assessments in an online environment. Consider instead going back to your learning goals for your students and build assessments that take advantage of the online environment. Working online, students can do research-based tasks or demonstrate higher-order thinking skills beyond simple recall and procedural knowledge questions. Here are some resources to help you think about alternatives:

If you’d like further assistance with reevaluating the use of online proctoring in your course, please contact us at cat@temple.edu or make an appointment with one of our educational technology or pedagogy specialists.

Hleziphi (Naomie) Nyanungo is the Director of Educational Technology and Jeff Rients is Senior Teaching & Learning Specialist at Temple’s Center for the Advancement of Teaching.

The Zoom Black Box Blues: Building a Flexible Camera Policy

Kyle Vitale & Jeff Rients

The question of whether or not to require that students keep their Zoom cameras on during synchronous online classes can be fraught. On the one hand, we use faces to help gauge participation, presence, and even the flow of conversation. On the other hand, a variety of legitimate concerns can keep students from turning their cameras on. As we enter a new semester, here are some ideas and strategies for crafting a course policy that respects your students’ needs while ensuring effective and rigorous class participation.

Let’s start by acknowledging that students have a lot of good reasons for turning off their cameras. These reasons can range from social (anxiety over being constantly seen by the rest of the class) to familial (sharing a small room with other zoomers) to technical (Zoom optimizes bandwidth, so turning off the camera may be the only thing keeping them in class when using a subpar internet connection). It is better to assume good faith on the part of the students. They logged into the Zoom room, after all, so let’s find ways to honor that decision.

Zoom is a communication tool and we recommend using it to communicate! Talk to your students. If the array of black boxes on the screen is impacting your ability to teach, discuss that fact with the students. As with all things, relate to them as human beings first. You might provide a flexible camera policy in your syllabus, and be sure to discuss your camera policy throughout the semester.

Also, please keep in mind that a live camera is not necessarily evidence of student engagement. Have you ever been in a meeting where you appeared more attentive than you actually were? Even in physical classrooms, presence does not always equate to attention. A robust participation policy will ensure engagement more than any hard rule about camera usage. Also, consider that the Zoom classroom is not a perfect recreation of a traditional classroom. Prior to the COVID lockdown, we did not spend our entire class time looking every single student in the class directly in the eyes from mere inches away. Now we spend all day doing exactly that! Meanwhile, we have no idea what students are looking at on their own screens.

With these facts in mind, you can take some simple steps to mitigate the issue. First of all, ask students to add a profile picture. This can be done by going to the profile section of zoom.temple.us or, in a live meeting, using the video settings tool to navigate to the profile settings. Some smiling faces, even still pictures, may help you feel more comfortable teaching in the Zoom environment.

Second, begin Zoom sessions with a breakout room activity. Students are more likely to turn on their cameras when doing a small group activity like discussing a question, reviewing prior material, or completing an activity. Some of those students may leave their camera on when they return to the main room, and regardless, students will have had a chance to warm up to class time.

Third, consider warm-calling. This strategy lets students know that they are expected to participate during class. In warm-calling, students reflect quietly on a question or chat together, before the instructor randomly calls on names. While reducing stress by giving students time to sort their thoughts, this strategy also maintains the expectation that students be focused and attentive to class lecture or discussion.

Fourth, practice screen rest. For long synchronous classes, consider a “screen break” or encourage all students to turn their cameras off during a reflective moment. This practice helps students suffering from Zoom fatigue and can reenergize everyone’s focus and attention.

Finally, we acknowledge that different types of courses require different levels of camera use. An acting instructor, for example, needs to see the faces of students performing a scene. If you need cameras on, make your case to the students. Explain how the camera helps them achieve the learning goals of the course. Specify when cameras must be on–such as when giving a presentation–and when it is okay to have them off. Review this policy with the students early in the course, remind them of it regularly, and incorporate these rules into your syllabus. Whatever approach you take to Zoom, make sure the students know what to expect from the beginning of the course.

The resources below offer more ideas for navigating Zoom camera policies. As always, feel free to reach out to the CAT with any questions!

Kyle Vitale and Jeff Rients are Associate Director and Senior Teaching & Learning Specialist at Temple’s Center for the Advancement of Learning, respectively.

Best Practices for Zoom Breakout Rooms

Jeff Rients

The breakout room features available in Zoom meetings allow us to craft learning experiences for our students that incorporate small group work. This allows students to test out new ideas and compare their learning to that of their peers. Importantly, this work blossoms in the lower-stakes environment of the small group, because individual students do not feel the same level of scrutiny and social pressure they face in front of their peers and the instructor.

Although breakout rooms are functionally analogous to small group work in the traditional classroom, they differ in some substantial ways. Perhaps the most important difference is that it is impossible to overhear what is happening in other small groups. Although the host of a Zoom meeting can visit each breakout room, you don’t receive any clues regarding student progress (or lack thereof) in the other rooms. Your ability to “read the room” is reduced in comparison to patrolling the room during in-person small group activities. Here are some strategies you can use for better oversight and overall improvement of your breakout room activities:

Clarify instructions

Sometimes breakout room activities don’t work out as planned because the students arrive at their room and don’t know what to do. Whenever possible give written instructions that you share via the File tool in the Chat window. You can also put these instructions on a slide and review them orally before sending students to the breakout rooms. This gives students a chance to review the task and ask questions before they leave the main meeting. If your activity has a hard time limit (and most activities should) include that on the instruction sheet and use the timer option when you set up the breakout rooms.

Keep lines of communication open

Remind students that they can use the Ask for Help button in the breakout room to reach out to you. You may also want to remind students that they can leave their breakout room and come back to the main room to ask a question. You can also use the Broadcast a Message to All tool to send short reminders or clarifications out to all rooms. (But keep in mind that such messages don’t stay up for long, so you may wish to broadcast important information more than once.) And don’t forget that both the host and co-hosts can visit any room they want, though co-hosts must be manually placed in a breakout room by the host first before they are able to move among the other rooms.. You could even appoint some students as co-hosts with the task of checking in on the breakout rooms.

Encourage accountability

Perhaps the easiest thing you can do to energize students in breakout rooms is to create activities that require some sort of reporting out to the instructor and/or the rest of the class. The simplest approach would be to call on students after the activity, asking them to share their results. (This technique works best when you warn the students ahead of time that you are going to do this; you can also put this fact in the instructions you share.) Another approach is to create a worksheet that each student must complete and hand in via the Canvas Assignment tool, with a deadline set for the end of the Zoom session. Or you can build the activity around a Canvas Quiz that the students work on together while in the breakout rooms.

Vary activities

Sometimes student participation wanes simply because they are used to the routine of the classroom. A new breakout room activity that requires different skills for success or that poses a new challenge can re-activate disengaged students.

Temple instructors needing additional assistance with breakout rooms or other educational technology issues are invited to visit our Virtual Drop-In Ed Tech Lab, a Zoom room that is open 8:30am-5pm Monday through Friday. There you’ll find our ed tech specialists ready to help you, with no appointment needed. Alternatively, you can make an appointment for a one-on-one consultation with a member of either our pedagogy or ed tech teams. We’re here to help you!

Jeff Rients is Senior Teaching and Learning Specialist at Temple’s Center for the Advancement of Teaching.

Four Ways to Cultivate Community in your Online Class

Cliff Rouder

We all know how empowering and motivating it feels when we’re part of a community working hard toward a common goal–perhaps now more than ever. That feeling of connecting and belonging; having a voice and knowing you’ll be heard; knowing you’re supported and supporting others: this is what community can feel like in an online course. But community is more than a feeling. Indeed, the research tells us that these are key ingredients to student success in your course, and by extension, to retention in the major and in college.

Understanding that community can look different depending on class size, here are some ways to build that foundation early on:

1. Make your goal of creating community transparent.

Tell your students the reasons why it’s important, what you will do, and what you expect them to do, to help build that community. You might even make this one of your course goals. By the end of the semester, what will students need to demonstrate to know whether they’ve met this goal, and how will you get them there? Perhaps it will be through successful collaborative work. Perhaps it will be through participating in discussion boards. Consider these other ideas below.

2. Build in different ways of presenting content and demonstrating competence.

If we proactively do this, then we will have met the learning needs of as many students as possible, which can reduce the need for individual student accommodation. Think about representing content via audio and visual means in addition to text. Think about alternative assessments besides exams and papers. We call this proactive approach to course design Universal Design for Learning, or UDL. As always in course design, we start with our course goals first and then work backwards to design assessments and learning activities.

3. Build in social opportunities for students.

How about creating a space where students can connect on a social level? Think of them gathering around the water cooler to talk about non-course related topics. Can you connect them to former students who are now working in their fields of interest? 

4. Personalize and humanize your online classroom.

There are many ways you can do this:

  • Welcome them into your home space. Show them your pet, your child, your environment, and encourage them to do the same. Be mindful though that some may be hesitant to appear on webcam, so encourage, but don’t require. Students can always use their audio, the Zoom chat tool, discussion boards, or photos if they don’t want to turn on their webcams.
  • Ask them to come to virtual office hours. You’ll be amazed at how a 10-minute “getting to know you” session can decrease their hesitation about coming to you for assistance. Then, check in frequently with the whole class in your synchronous or asynchronous sessions.
  • Do some interesting ice-breakers. Try on for size “Three truths and a lie,” or “What are you binge-watching?” This gets students talking about themselves, but also comparing their experiences to their peers.
  • Have them send you the pronouns they use and be mindful about using them. Everyone has a need to feel validated and this is a simple step that can greatly assist some of our most vulnerable students.
  • Create guidelines together for communicating respectfully when their points of view differ. An online course is an artificial space where the rules of interaction don’t always seem obvious. Inviting the students to participate in setting the ground rules for civil discourse gets them involved in building community from the ground up.
  • Purposefully connect course content to their lives and future ambitions. Remember, your course does not exist in isolation, but it can feel that way to students. Always look for opportunities to connect your course to recent events, their past experiences as students, and/or their personal and career aspirations.

With just a little effort–and some humanity–you can create a community of learners in your online course. As always, the CAT is here to help you in this endeavor, so don’t hesitate to book a consultation with one of our amazing faculty developers or educational technologists at catbooking.temple.edu. We’ve also compiled a great collection of resources to help you design your online course, which you can access at teaching.temple.edu/design.

Cliff Rouder, Ed.D., is Pedagogy and Design Specialist at Temple University’s Center for the Advancement of Teaching.

Put the Library Where Your Students Are Learning

Olivia Given Castello and Nicole DeSarno

The Course Navigation link to the Library

The library is a critical learning support for college students, but the challenge is to make students aware of all the library provides. Since many students are learning partially or fully online, Learning Management System (LMS) integration is a handy way to bring library resources and librarian help to your students where they learn: in your LMS course.

Integrating library resources into the LMS can make your students more successful by giving them easy library access. Linking to library content within a course has been shown to increase students’ use of materials. Including information about library services gives them access to learning support when and where they need it, in a way they can refer back to throughout the semester. This can be especially useful for connecting the library to distance students and hybrid online learners, many of whom seldom visit the library in person.

LMS platforms can connect automatically with systems used by academic libraries. Two common ones are Research Guides and Course Reserves. There are also simple best practices you can follow when linking to library resources that will improve your students’ connection to the library.

Research Guides

Research guides are librarian-authored web pages recommending library resources to help students get started on research for particular disciplines, courses, or assignments. At Temple University, research guides are automatically integrated into the LMS via the “Library” link, an item in the default Course Navigation menu located in the left-hand column of Canvas courses. When clicked, this link shows a matched guide from Temple Libraries’ Research Guides system. The guide shown varies depending on the Canvas course. In most courses, the Library link shows a generic guide that highlights commonly sought information and tools, such as building hours, book and article search, a chat widget for live librarian help, and an online scheduler for research appointments. 

In courses where a faculty member works with a librarian to create a course-specific research guide, that guide is shown. In our pilot study at Temple, we learned that students engaged most with the Library link when it showed a course-specific library research guide! 

Having library resources in the LMS helps students build research skills and get help, and automatic integrations like Temple’s Library link bring these resources to students without any extra work for the faculty member.

Beyond automatic integrations, faculty can also manually add smaller portions of research guides in other areas of a course. Once you identify a single box or page from a larger research guide that would help your students, you can manually embed it in the area of your course content where students will find it most useful. At Temple, this type of content can be added to Canvas as an “External Tool.”

Course Reserves

Another common library integration concerns course reserves: high demand materials related to a specific course that you can make available to students via your library. E-reserves are downloadable in the LMS, while physical reserves are available for short term lending at the library. 

At Temple, faculty members can add the Course Reserves tool, which is separate from the default Library link, to Canvas’ navigation menu in the course SettingsYou then request items be placed on reserve from within the tool by adding new requests or importing Reserves items from a previous semester. Library staff see and process the requests, and arrange any necessary document scanning, purchasing, or other additional steps. Once processed, the active reserve items show in the Canvas course.

Persistent links to library e-resources

Academic libraries offer many types of content that you can integrate directly into the LMS as course materials: articles, ebooks, videos, databases, and more — but use persistent links, not the URL in the browser window. A persistent link (a.k.a. durable link, stable link, permalink) is a URL that connects directly to a specific full-text source in a library database or electronic subscription. Using the persistent, library-linked, URL ensures all students (on-campus and off) can access the source. These links are stable over time, and they also eliminate the need to worry about potential copyright issues since students will be directed through the institutional login page if necessary for access. Different databases offer varying options for getting a persistent link to an item, depending on their interface. 

At Temple, persistent links can be added to Canvas as an “External URL.” Intentionally linking to library e-resources is the way to make optimal use of your library’s collections. It also creates a bridge for students to library research support services, since many library e-resource platforms include embedded librarian help.

Want to get started connecting to the library in your LMS?

To explore options for integrating the library into your LMS course, contact your institution’s library staff. Librarians will consult with you on how to integrate library resources, and can let you know what automatic integrations are available on your campus.

At Temple University, start at our guide to embedding library resources in Canvas. It includes step-by-step instructions and short video tutorials on the options described here. Contact your subject librarian to discuss the best library resources for your class, request a course-specific library guide be created, or change what shows on the Library link in your course. Consider adding a librarian to your course in the Designer role. We are happy to help with library-related Canvas options. Have other questions? Need additional help? Email us at asktulibrary@temple.edu!

Olivia Given Castello and Nicole DeSarno are members of the Learning & Research Services unit of Temple University Libraries.

Using Online Student Learning Evaluations to Improve Instruction

Steven Bell, Associate University Librarian, Temple University

My first experience teaching an online course occurred in the late 1990s when Drexel University’s College of Information Studies asked me to convert my face-to-face digital research course to an online format. My  primary focus  was just getting things to work. Quality learning experiences were an afterthought.

Fast forward to 2017 and after a ten-year gap I agree to teach online again, this time for San Jose State University’s (SJSU) iSchool program for aspiring librarians. Despite my prior experience teaching online, I took a mandatory 25-hour mini-course in online instruction. It reinforced much of what I learned in other professional development experiences, but also introduced me to Canvas.

Less anticipated was the robust expectation to achieve continuous learning. SJSU takes online education seriously and the institution requires that all online courses adhere to the Quality Matters ™ framework. Their high-quality standards require instructors to complete continuous learning modules in any semester they teach. One of these sessions got me thinking differently about student evaluations. Instead of perceiving them as a necessary evil, I discovered they can serve as both motivator and shaper of quality instruction.

In the online session “SOTES Strategies and Lessons” I learned that student evaluations, when analyzed in aggregate, help instructors to modify their educational methods to align with student learning needs. SOTES, (Student Opinion of Teaching Effectiveness) is SJSU’s student evaluation system. No doubt every instructor reviews course evaluations seeking clues that lead to substantive learning improvement. Instead of tweaks to assignments or syllabi, SOTES can lead to fundamental pedagogical change.

The SOTES session gave twelve tips – focusing on ways to anticipate what most helps students learn and succeed – to influence how educators can design a better learning experience.

Be Practical to Demonstrate Relevance

Theory is important but these mostly adult learners, often working in the field, want concrete examples and anecdotes. Use practical assignments and explain how students will benefit later.

Create Assignments to Enhance Learning
Students want assignments directly relevant to what’s in the lecture. Their top two requests: avoid giving busy work; structure assignments into smaller blocks that build on each other.

Emphasize What’s Important
Provide a verbal or written summarization of the top takeaways from a learning module’s content. Keep reiterating key concepts. Share your observations on the best ideas from course discussions. At the start of each week, I summarize what students should know from the prior week, where they demonstrated competency, where improvement is needed, and how it will apply to new content.

Respond, Respond, Respond

We are told to quickly and comprehensively respond to students’ questions and comments, in discussions or emails. The SOTES clearly confirm that. Respond in a variety of communications formats (audio, video, email, etc.) and keep it cordial and respectful. Avoid putting students on the spot or making them feel regret over their question or comment.

Set the Atmosphere
Online learning is about more than content and assignments. Students expect a patient, positive and encouraging instructor who is present, well organized and gives students opportunities to interact and learn from each other. The right classroom culture facilitates learning.

Easy to Approach
If the atmosphere is right, students will feel they can easily contact and communicate with their instructor. My course was asynchronous, but I offered a weekly synchronous office hour (varying days/times) in order to create connection and elevate students’ comfort level in reaching out to me.

Appreciate Student Diversity
Students respond poorly to an instructor who plays favorites with respect to differences in age, gender, race or work experience. Pay attention to differing backgrounds in student’s self-introductions and commit to treating students equally.

Passion Speaks Loudly
Set the tone by being the champion for the course topic. Instructor enthusiasm is contagious. If the instructor lacks excitement for the topic, students will too.

Challenge Them Intellectually
Students want “make us think” activities that require more than answers to rote questions. Encourage creative thinking by allowing students to develop multimedia projects in which they apply course concepts to their own experience.

Fair Grading Matters
Creating clear assignment instructions and rubrics to guide students is no easy task, but taking time in advance to think through the details of assignment grading will minimize grading disputes or claims of unfairness.

Make the Complex Understandable
Students expect their instructor to make the abstract concrete through the use of realistic examples. Communicate your personal experience in lectures, assignment instructions and discussions.

Provide Meaningful Feedback
Give praise for work well done as well as constructive criticism. Be specific in pointing out what students get right and where they need to improve. Add comments to graded assignments and return them to students while they can benefit from feedback.

Whatever personal opinions online instructors hold about student evaluations, it feels much better when they reflect a uniformly successful learning experience. Learning those factors that lead students to judge a course as successful and an instructor as competent, organized and responsive, greatly shift the odds of a positive outcome in the instructor’s favor. The SOTES session changed how I think about student evaluations. I now see them as a valuable resource for course design, not simply an after-the-fact measure of “How’d I do?”. Though mostly applicable to online learning, these dozen tips could work equally well for face-to-face courses. I encourage you to put them into your practice.