Cliff Rouder & Linda Hasunuma

We and our students are experiencing a time of powerful social transformation amidst a global health crisis. The physical, social, and emotional toll that we all may be experiencing brings into focus the need for an awareness of trauma’s impact on learning. The Center for the Advancement of Teaching recently sponsored a three-part workshop on trauma-informed teaching in which Temple faculty and representatives with expertise in this area from Temple’s Wellness Resource Center, Office of Inclusion, Diversity, Equity, Advocacy and Leadership (IDEAL), and Tuttleman Counseling Services helped us understand what trauma is, how it can impact student learning (and us), and the scope of our role to help students succeed. We have gathered key ideas and helpful information from these sessions in this blog post to guide you in creating spaces for learning that support student success.
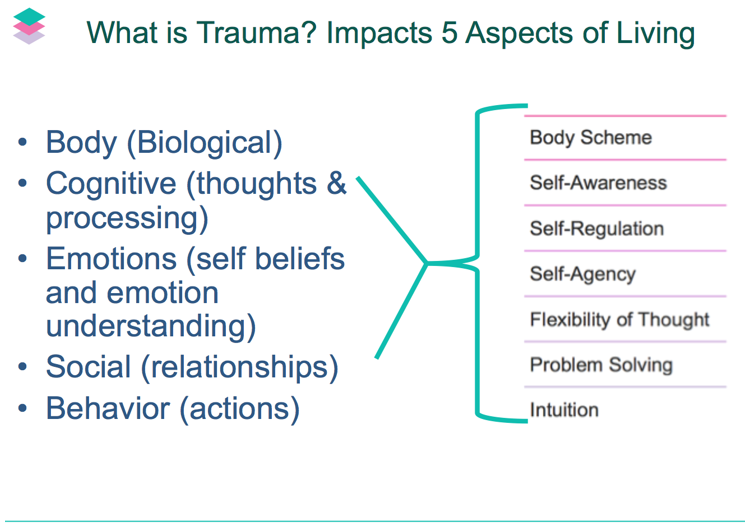
What is Trauma and Why Does It Matter?
The classic/traditional definition is “psychologically distressing event involving “exposure to actual or threatened death, serious injury, or sexual violence…” (American Psychiatric Association, 2013, p. 261).
It involves a sense of fear, helplessness, and horror. Childhood trauma occurs whenever both internal and external resources are inadequate to cope with an external threat (van der Kolk, 1989). As instructors, it is always helpful to keep in mind that trauma can affect the students in our classroom and us, but in the time of a pandemic and an intense struggle for racial justice, this trauma can be exacerbated.
While most people understand the effects that trauma can have on a person, they may not realize that trauma can also affect cognitive, social, behavioral, and physical functioning. Students, and you, bring all of these effects into the classroom with you.
© Amy K. Lynch and Kelly Mahler
How Might Trauma Manifest in the Classroom?
An awareness of the ways in which trauma can manifest for students can serve us as educators in class and during office hours. These include, but are not limited to:
- Inappropriate interpersonal boundaries, such as demanding additional information and/or participation in processes.
- Emotional responses that are not typically acceptable as “professional behavior.”
- Rigid thinking/cognitive inflexibility.
- A loss of self-agency and coping strategies.
It is important, too, to be aware of the ways in which forces of oppression, such as anti-Black racism, can impact students:
- Psychological Impact: attentional/focus difficulty, feelings of helplessness, chronic stress, apathy, hypervigilance to discrimination/oppression, and perfectionism/burnout.
- Physiological Impact: somatization (e.g., headaches, rapid heartbeat), sleep difficulties, and disconnection.
What Steps Can I Take to Help All Students Succeed?
Faculty are not therapists or counselors, nor should they be. Within our scope of practice as faculty, however, here are several concrete strategies that you can employ:
- Be aware of and manage your own trauma response so that you don’t negatively impact the dynamics of your class.
- Be clear about your goals and maintain a routine and structure in a simplified and organized way in areas like your Canvas course design.
- Work intentionally to build trust:
- Assess students’ needs before the semester begins to identify what learning challenges they may be facing. A simple (private) survey asking students their name and major, and if they’re comfortable, asking if there are things about their identity that would be helpful for you to know. In addition, asking them to share any barriers that might impact their learning can help you proactively meet their diverse needs.
- Recognize ways in which our own biases (both explicit and implicit) are reflected in course content or policies and may activate a racial trauma response. Make changes accordingly. For more information about implicit bias, view this resource.
- Create a welcoming and supportive space where students can share and take risks to decrease the likelihood of feeling marginalized.
- We can also create that supportive space by setting expectations for engagement and accountability and working through strategies for meeting those expectations. Please see the section titled, “Setting Community Standards for Online Discussions” in this resource.
- Acknowledging the impact of racism and racial stress is a critical step in creating a learning environment where students can feel heard and affirmed. One way we can do this is by addressing microaggressions (unintended things we and other students say or do that can be hurtful).
- Check in frequently about what’s working and what’s not; take the “temperature” of the class.
- Offer options in your assignments and assessments as to how students demonstrate what they’ve learned. Choices support a sense of autonomy.
- Take a team approach! Resources like Tuttleman Counseling Services, IDEAL, Disability Resources and Services, and the Wellness Resource Center can support your efforts to promote student well-being.
- What are the Boundaries of my Role as Instructor?If a student’s behavior is proving detrimental to themselves or to the effective functioning of your class, you can speak to that student privately to empathetically express concern about the behaviors and attempt to find workable strategies to address those behaviors so they do not impact the functioning of your class. Faculty are often concerned about how to manage this type of conversation. Here is some helpful guidance to consider: Validate student feelings “That sounds like a lot to be experiencing.” Start from a place of caring. Be compassionate as you frame the need for the discussion. Communicate that the intention of this discussion is to help rather than to punish. Appreciate the courage it took to share “Thank you for sharing this with me–I know it takes a lot of courage.” “Thank you for trusting me enough to share this experience.” If a student does share something as personal as past trauma with you, it’s likely because you have created an environment of trust and caring. So, kudos for that! You can first express appreciation that the student has shared this with you. Refer to skills and supports “What supports or resources have worked for you in the past?”“There are folks available who can help. Could I share some information with you?” If a student shares a traumatic experience specifically about sexual misconduct since they have been a student at Temple, let them know you must report that to the Title IX Coordinator, and that they can be a part of the reporting process. Learn more at sexualmisconduct.temple.edu. If a student shares a plan to harm themselves or others, please contact TUPD (215-204-1234) or 911. There are resources available for students in non-emergent crises, such as the Crisis Text Line, or hotlines for interpersonal violence and sexual violence. Remember that the key to great teaching, no matter the challenge, is communication, empathy, flexibility, and the willingness to see our students as the complex, wonderful human beings they are. We are deeply grateful to the facilitators of the trauma-informed teaching workshops:
- Crystal Austin, Ph.D., Assistant Professor of Instruction, College of Education and Human Development
- Hillary Black, LCSW, Assistant Coordinator of Sexual Assault Counseling and Education (SACE), Tuttleman Counseling Services
- Valerie Dudley, Ph.D., Director of Multicultural Education, Institutional Diversity, Equity, Advocacy & Leadership (IDEAL)
- Amy Lynch, Ph.D., OTR/L, Associate of Professor of Instruction, College of Public Health
- Aisha Renee Moore, MSW, LCSW, Coordinator of the Sexual Assault Counseling and Education (SACE) Unit at Tuttleman Counseling Services
- Nu’Rodney Prad, M.S., Director of Student Engagement, Institutional Diversity, Equity, Advocacy & Leadership (IDEAL)
- Jessica S. Reinhardt, Ph.D., Associate Professor of Practice, College of Education and Human Development
- Liz Zadnik, M.A., Associate Director, Wellness Resource Center
- Assess students’ needs before the semester begins to identify what learning challenges they may be facing. A simple (private) survey asking students their name and major, and if they’re comfortable, asking if there are things about their identity that would be helpful for you to know. In addition, asking them to share any barriers that might impact their learning can help you proactively meet their diverse needs.
Cliff Rouder, Ed.D., is Pedagogy & Design Specialist for the Center for the Advancement of Teaching. Linda Hasunuma, Ph.D., is Assistant Director of Temple University’s Center for the Advancement of Teaching.


