By Luling Huang
When we collect data from the Web through API (e.g., Twitter), we usually receive data in JSON (JavaScript Object Notation). How do we sift out unwanted information and transform JSON into the tabular formats many data analysis programs recognize (e.g., CSV; Comma-Separated Values)?
This post introduces a powerful command line tool called jq for processing json data. It works on multiple platforms (see more for installation here). The primary reason to use jq is that no coding is involved. Although Python’s “json” package is easy to work with, jq can get what we want even with just one line of command.
The data structure of JSON is similar to Python’s dictionary (with key-value pairs, in JSON they’re called name-value pairs). This is why Python’s “json” package is very handy if we have already stored some data in Python’s dictionary. But let’s just assume no Python is involved and we just get a JSON file from somewhere.
In OS X’s Terminal (it should work similarly on Windows), we can display the structure of a JSON file called “test.json” with this command (remember to navigate to the directory that stores the file first):
$ jq '.' test.json
“jq” simply invokes jq. “.” is the basic jq operator to filter information. Here the JSON file is just reproduced without filter. Below is a small portion of a tweet’s information from a Twitter data set (collected through twarc). We can interpret the data structure from a CSV perspective: in one row (for each tweet), we have 6 variables (“contributors,” “truncated,” “is_quote_status,” etc.) as column names, and we have 6 corresponding values for each variable for that tweet (“null,” “false,” “false,” etc.).
Because Twitter API gives us a lot metadata information that may not be relevant, our next task is to find the information we want to use for data analysis. Let’s say “id” is what we want to keep.
$ jq '.id' test.json
The above command will print out all the values under the attribute name of “id.” To see how many tweets we have collected, we can do this:
$ jq '.id' test.json | wc -l
“wc” is for word count and “-l” is for counting number of lines in output (this is a built-in command in Terminal, not part of jq). And we use “|” to “pipe” the result of filtering into the function for counting.
From inspecting the data, we know that tweet content is stored under the attribute name of “full_text.” Let’s extract this information together with id, and put the filtering result in an JSON array enclosed by [ ] for each tweet.
Note that in the original JSON file, each tweet is enclosed by { } (i.e., a JSON object with name-value pairs). Because we want to save the output to CSV, name-value pairs are no longer needed. Instead, we need arrays to represent rows in CSV. In other words, the hierarchical JSON structure is flattened.
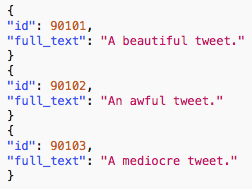
The procedure can be illustrated with a simple example. This is what we begin with (there are three tweets each of which is a JSON object and each object has two name-value pairs):
Then we extract the information from “id” and “full_text” and put it into three arrays each of which is for one tweet:
If we write each array as one row, then we have the CSV output (if necessary, column names can be added easily later):
By using jq, we can achieve this with:
$ jq -r '[.id, .full_text] | @csv' test.json > test.csv
“[.id, .full_text]” means we create a new JSON array and put the filtered information in it. Then we pipe the array to “@csv,” which formats the array to CSV. “-r” is for “raw output,” which tells jq to treat the CSV formatted result as plain text. “> test.csv” designates the output file.
Now we have turned a JSON file into a two-column CSV and it’s ready to be put into data analysis programs.
For more information on JSON syntax, here is the official introduction page. Also, there are many other features in jq and here is the manual.


Awesome! Its truly awesome paragraph, I have got much clear idea about from
this post.