How Can We Help?
Using the Jetpack Plugin
The Jetpack plugin provides many features that are separated into modules. Each desired module must be enabled after activating Jetpack. You are required to have a free WordPress.com account to use Jetpack.
Activating Jetpack
- Visit your site Dashboard and find the Plugins link on the left menu.
- Find “Jetpack by WordPress.com” in the list of plugins, and click “Activate.”
- Click the new “Jetpack” menu item on the left administration menu, just below “Dashboard.”
- Click the green button “Connect Jetpack.”
- Create a WordPress.com account or login with an existing one by clicking the link below the signup form.
- Click “Approve” and select the “Free” plan.
- Activate the Jetpack module(s) that you would like to use by visiting the “Settings” menu underneath “Jetpack” on the left. From this page you can click on a module to get more information about it or click the “Activate” link to the right to enable the module.
Jetpack’s Modules
- Beautiful Math: LaTeX is a powerful markup language for writing complex mathematical equations, formulas, and more.
- Carousel: With Carousel active, any standard WordPress galleries you have embedded in posts or pages will launch a gorgeous full-screen photo browsing experience with comments and EXIF metadata.
- Contact Form: A contact form is a great way to offer your readers the ability to get in touch, without giving out your personal email address.
- Custom CSS: The Custom CSS Editor allows you to customize the appearance of your theme without the need to create a child theme or worry about theme updates overwriting your customizations.
- Custom Content Types: The Custom Content Types module adds custom post types (CPTs) to your site.
- Extra Sidebar Widgets: The “Extra Sidebar Widgets” module includes widgets you can add to your blog. From RSS Links to Twitter Timelines and Facebook Like Boxes to social icons, this module makes it easy to add extra functionality to your site.
- Gravatar Hovercards: A Gravatar is your profile on the web, and the Hovercard is one way your information is made visible to others. It’s an easy way to help people find your blog, or access your identity on other services like Twitter, Facebook, or Linkedin.
- Markdown: Markdown lets you compose posts and comments with links, lists, and other styles using regular characters and punctuation marks. Markdown is used by writers and bloggers who want a quick and easy way to write rich text, without having to take their hands off the keyboard, and without learning a lot of complicated codes and shortcuts.
- Mobile Theme: Jetpack’s Mobile Theme displays your content in a clean, uncluttered interface, making it easy for mobile visitors to scan your site. Furthermore, we took special care to make the mobile theme as lightweight as possible to ensure faster loading times.
- Omnisearch: Omnisearch makes it easy to search for anything, both locally on your site, and from select providers on the web!
- Publicize: Publicize makes it easy to share your site’s posts on several social media networks automatically when you publish a new post.
- Related Posts: The Related Posts feature scans all of your posts, analyzes them, and lets you show contextual posts your visitors might be interested in reading after they’re done with whatever post they’re on.
- Sharing: This guide will show you how to add sharing buttons to your blog posts to give your readers the ability to easily share your content with Twitter, Facebook, and a host of other services, to help your message spread across the web.
- Shortcode Embeds: Shortcodes allow you to embed videos from YouTube, maps from Google, tweets from Twitter, and other media across the web directly in to your WordPress-powered site.
- Site Stats: WordPress.com Stats lets you know how many visits your site gets, and what posts and pages are most popular.
- Sitemaps: Sitemaps are files that list each post and page that should be indexed by search engines like Google or Bing. Jetpack allows you to generate such files thanks to the Sitemaps module.
- Spelling and Grammar: Jetpack can check your spelling, grammar, and style using ‘After the Deadline’ proofreading technology.
- Subscriptions: This page covers the many ways you can use Jetpack’s Subscriptions module to let visitors to your site sign up to receive notifications of your latest posts and comments.
- Tiled Galleries: With Tiled Galleries you can display your image galleries in three new styles: a rectangular mosaic, a square mosaic, and a circular grid. The rectangular and square tiled layouts also have hover-over captions to save space while making captions accessible.
- WP.me Shortlinks: Shortlinks are a quick way to get short and simple links to your posts and pages. They use the wp.me domain so you can have more space to write on social media sites.
- Widget Visibility: The Widget Visibility module enables you to configure widgets to appear only on certain pages (or be hidden on certain pages) by using the Visibility panel.
By default, the only module that will be activated when Jetpack is enabled will be Shortcode Embeds
to turn on any of these modules go to the following
https://sites.temple.edu/{YourSitesName}/wp-admin/admin.php?page=jetpack_modules
Next, to the module you want to use, click the ‘activate’ button.
You can also find the list on Jetpack’s Debug page.
- Go to Jetpack → Dashboard and scroll to the bottom.
- Click Debug to open the “Debugging Center” page.
- Click the “Access the full list of Jetpack modules available on your site.” link at the bottom.

You know you’ve landed in the right place when you see the following list:
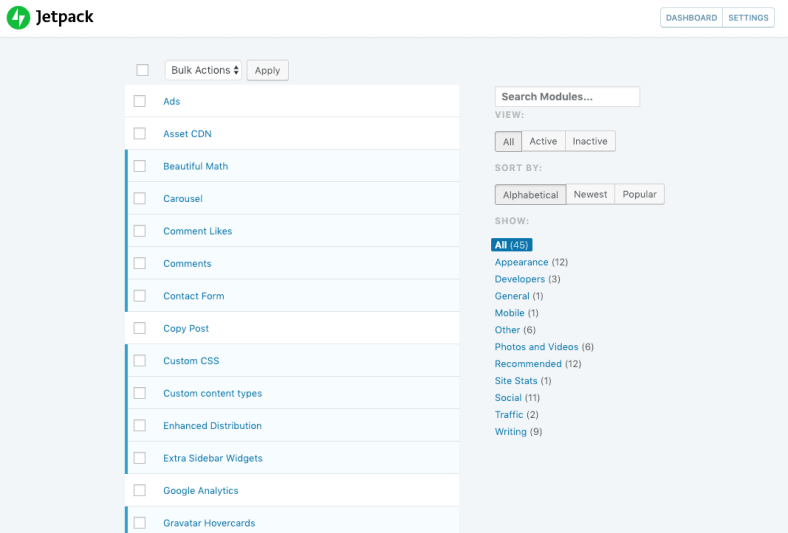
The blue line on the left indicates that the module is active. Click the boxes next to the various modules to turn them on and off as desired.
When you hover over the module, you’ll see different options appear based on whether the module is active or not. You can also use the Activate and Deactivate buttons to control the status of the module.
The Configure button that appears for activated modules will take you to the configuration area in the admin dashboard for that module.
You must be logged in to post a comment.