Manage Posts
Posts are the entries that display in reverse chronological order on your home page. In contrast to pages, posts usually have comments fields beneath them and are included in your site’s RSS feed.
To write a post:
- Log in to your WordPress Administration Panel (Dashboard).
- Click the Posts tab.
- Click the Add New Sub Tab
- Start filling in the blanks.
- As needed, select a category, add tags, and make other selections from the sections below the post. Each of these sections is explained below.
- When you are ready, click Publish.
Screen Options
The Screen Options allow you to choose which Post Fields are displayed, or not displayed, in the underlying SubPanel. Clicking on the Screen Options tab shows a list of the columns with a check-box next to each column. Check the box for each Post Field you want displayed, or uncheck the box to not display that module. Click the Screen Options tab again to close the Screen Options. These options are saved so that you can customize how your own editing screen looks.
Note: Some screen options on the Post Administration Panel are hidden by default if they have not been saved before. Hidden by default: Excerpt, Post Author, Discussion, Custom Fields, Slug, Comments, Send Trackbacks, Revisions. To unhide these options, there is a small tab called Screen Options in the top right of the page, just under the WordPress administration bar. Just check the boxes for to display and use these options.
Descriptions of Post Fields

WordPress Admin Writing Post Advanced Panel – Top of Page
- Title
- The title of your post. You can use any phrases, words or characters. Avoid using the same title twice as that will cause problems. You can use commas, apostrophes, quotes, hypens/dashes, and other typical symbols in the post like “My Site – Here’s Lookin’ at You, Kid”. WordPress will then clean it up to generate a user-friendly and URL-valid name of the post (also called the “post slug”) to compose the permalink for the post.
- Post Editing Area
- The blank box where you enter your writing, links, links to images, and any information you want to display on your site. You can use either the Visual or the Text view to compose your posts. For more on the Text view, see the section below, Visual Versus Text View.
- Preview button
- Allows you to view the post before officially publishing it.
- Publish box
- Contains buttons that control the state of your post. The main states are Published, Pending Review, and Draft. A Publishedstatus means the post has been published on your blog for all to see. Pending Review means the draft is waiting for review by an editor prior to publication. Draft means the post has not been published and remains a draft for you. If you select a specific publish status and click the update post or “Publish” button, that status is applied to the post. For example, to save a post in the Pending Review status, select Pending Review from the Publish Status drop-down box, and click Save As Pending. (You will see all posts organized by status by going to Administration Panels > Posts > Edit). To schedule a post for publication on a future time or date, click “Edit” in the Publish area next to the words “Publish immediately”. You can also change the publish date to a date in the past to back-date posts. Change the settings to the desired time and date. You must also hit the “Publish” button when you have completed the post to publish at the desired time and date.
- Publish box
- Visibility – This determines how your post appears to the world. Public posts will be visible by all website visitors once published. Password Protected posts are published to all, but visitors must know the password to view the post content. Private posts are visible only to you (and to other editors or admins within your site)
- Permalink
- Permalink stands for “permanent link”. That means a post URL that does not expose the post ID which could be subject to a change (e.g. when moving to different blogging system), but it rather contains a user-friendly post name derived from the post title which could also change, although not recommended, but in a more controllable way. This post name (also referred to as “post slug” or just “slug”) can be edited, depending on your Permalinks settings, using the “Edit” button. (To change your settings, go toAdministration Panels > Settings > Permalinks). The permalink is automatically generated based on the title you set to the post and is shown below the title field. Punctuation such as commas, quotes, apostrophes, and invalid URL characters are removed and spaces are substituted with dashes to separate each word. If your title is “My Site – Here’s Lookin’ at You, Kid”, it will be cleaned up to create the slug “my-site-heres-lookin-at-you-kid”. You can manually change this, maybe shortening it to “my-site-lookin-at-you-kid”.
- Save
- Allows you to save your post as a draft / pending review rather than immediately publishing it. To return to your drafts later, visit Posts – Edit in the menu bar, then select your post from the list.
- Publish
- Publishes your post on the site. You can edit the time when the post is published by clicking the Edit link above the “Publish” button and specifying the time you want the post to be published. By default, at the time the post is first auto-saved, that will be the date and time of the post within the database.
- Post Tags
- Refers to micro-categories for your blog, similar to including index entries for a page. Posts with similar tags are linked together when a user clicks one of the tags. Tags have to be enabled with the right code in your theme for them to appear in your post. Add new tags to the post by typing the tag into the box and clicking “Add”.
- Categories
- The general topic the post can be classified in. Generally, bloggers have 7-10 categories for their content. Readers can browse specific categories to see all posts in the category. To add a new category, click the “+Add New Category” link in this section. You can manage your categories by going to Administration Panels > Posts > Categories.
- Excerpt
- A summary or brief teaser of your post featured on the front page of your site as well as on the category, archives, and search non-single post pages. Note that the Excerpt does not usually appear by default. It only appears in your post if you have modified the template file listing the post to use the_excerpt() instead of the_content() to display the Excerpt instead of the full content of a post. If so, WordPress will automatically use as the Excerpt the first 55 words of your post content or the content before the <!--more--> quicktag. If you use the “Excerpt” field when editing the post, this will be used no matter what. For more information, see Excerpt.
- Send Trackbacks
- A way to notify legacy blog systems that you’ve linked to them. If you link other WordPress blogs, they’ll be notified automatically using pingbacks. No other action is necessary. For those blogs that don’t recognize pingbacks, you can send a trackback to the blog by entering the website address(es) in this box, separating each one by a space. See Trackbacks and Pingbacks for more information.
- Custom Fields
- Custom_Fields offer a way to add information to your site. In conjunction with extra code in your template files or plugins, Custom Fields can modify the way a post is displayed. These are primarily used by plugins, but you can manually edit that information in this section.
- Discussion
- Options to enable interactivity and notification of your posts. This section hosts two check boxes: Allow Comments on this postand Allow trackbacks and pingbacks on this post. If Allowing Comments is unchecked, no one can post comments to this particular post. If Allowing Pings is unchecked, no one can post pingbacks or trackbacks to this particular post.
- Password Protect This Post in Classic editor
- To password protect a post in the classic editor, click Edit next to Visibility in the Publish area to the top right, then click Password Protected, click Ok, and enter a password. Then click OK. Note – Editor and Admin users can see password protected or private posts in the edit view without knowing the password.
-
- Password Protect This Post in Gutenberg editor
- password protect a post in the Gutenber editor, click the underlined blue text next to ‘Visibility‘ under ‘Status and Visibility‘
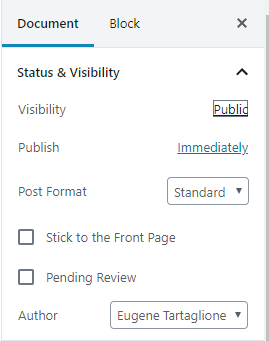
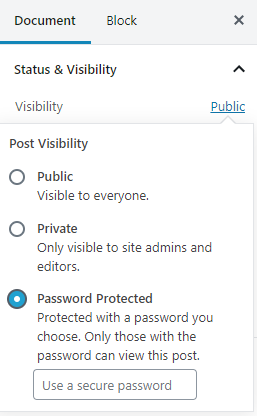
- After selecting the Visibility, choose ‘Password Protected’. After selecting this option you will be able to enter a password for this post.
- Edit next to Visibility in the Publish area to the top right, then click Password Protected, click Ok, and enter a password. Then click OK. Note – Editor and Admin users can see password protected or private posts in the edit view without knowing the password.
- password protect a post in the Gutenber editor, click the underlined blue text next to ‘Visibility‘ under ‘Status and Visibility‘
- Post Author
- A list of all blog authors you can select from to attribute as the post author. This section only shows if you have multiple users with authoring rights in your blog. To view your list of users, see Users tab on the far right. For more information, see Users and Authors.

WordPress Admin Writing Post Advanced Panel – Bottom of Page
Note: You can set basic options for writing, such as the size of the post box, how smiley tags are converted, and other details by going to Administration Panels > Settings > Writing. See Writing Options SubPanel.
Visual Versus Text Editor
When writing your post, you have the option of using the Visual or Text mode of the editor. The visual mode lets you see your post as is, while the Text mode shows you the code and replaces the WYSIWYG editor buttons with quicktags. These quicktags are explained as follows.
- b – <strong></strong> HTML tag for strong emphasis of text (i.e. bold).
- i – <em></em> HTML tag for emphasis of text (i.e. italicize).
- b-quote – <blockquote></blockquote> HTML tag to distinguish quoted or cited text.
- del – <del></del> HTML tag to label text considered deleted from a post. Most browsers display as striked through text. (Assigns datetime attribute with offset from GMT (UTC))
- link – <a href=”http://example.com”></a> HTML tag to create a hyperlink.
- ins – <ins></ins> HTML tag to label text considered inserted into a post. Most browsers display as underlined text. (Assigns datetime attribute with offset from GMT (UTC))
- ul – <ul></ul> HTML tag will insert an unordered list, or wrap the selected text in same. An unordered list will typically be a bulleted list of items.
- ol – <ol></ol> HTML tag will insert a numbered list, or wrap the selected text in same. Each item in an ordered list are typically numbered.
- li – <li></li> HTML tag will insert or make the selected text a list item. Used in conjunction with the ul or ol tag.
- code – <code></code> HTML tag for preformatted styling of text. Generally sets text in a
monospaced font, such as Courier. - more – <!–more–> WordPress tag that breaks a post into “teaser” and content sections. Type a few paragraphs, insert this tag, then compose the rest of your post. On your blog’s home page you’ll see only those first paragraphs with a hyperlink (
(more...)), which when followed displays the rest of the post’s content. - page – <!–nextpage–> WordPress tag similar to the
moretag, except it can be used any number of times in a post, and each insert will “break” and paginate the post at that location. Hyperlinks to the paginated sections of the post are then generated in combination with the wp_link_pages() or link_pages() template tag. - lookup – Opens a JavaScript dialogue box that prompts for a word to search for through the online dictionary at answers.com. You can use this to check spelling on individual words.
- Close Tags – Closes any open HTML tags left open–but pay attention to the closing tags. WordPress is not a mind reader (!), so make sure the tags enclose what you want, and in the proper way.
You must be logged in to post a comment.