
While ArcGIS Online provides a lot of great functionality out of the box, sometimes there are levels of customization that can only be brought about by designing a webmap programmatically. Fortunately, there are several Application Programming Interfaces (APIs) that take care of a lot of the baseline programming required for creating a custom webmap. Two of the most popular APIs include Leaflet and the ArcGIS API for Javascript. Although Leaflet is what is taught at Temple in GUS 4064, Web Mapping and Map Servers, I will be focusing on the ArcGIS API for Javascript. The concepts are the same, however, the ArcGIS API provides built in support for vector (SVG) path map graphics, which will be the focus of the next blog post. This post will focus on the basics of getting a webmap up and running using the API.
Unlike its desktop environment counterpart, the ArcGIS API for Javascript is free to use. They do, however, charge you to utilize their more advanced online analysis services, such as performing network analysis or geocoding locations. For the purposes of creating a simple and interactive webmap, what is provided for free should suffice.
The first step is to download a code editor that will allow you to write code for basic web development. There are many options that will work for the purposes of this blog post, and you may already have a favorite picked out and installed. After installing your code editor of choice, create a working directory where you will save all of the files create which store your code. Once you have the directory created, open the newly installed code editor and create a blank / empty document. Save this document as Index.html into your working directory. This will both create the file in which your code will be saved, but also let your editor know that you are going to be writing an HTML document.
By following the instructions on this page, I was able to create a functioning webmap based off of the code below:
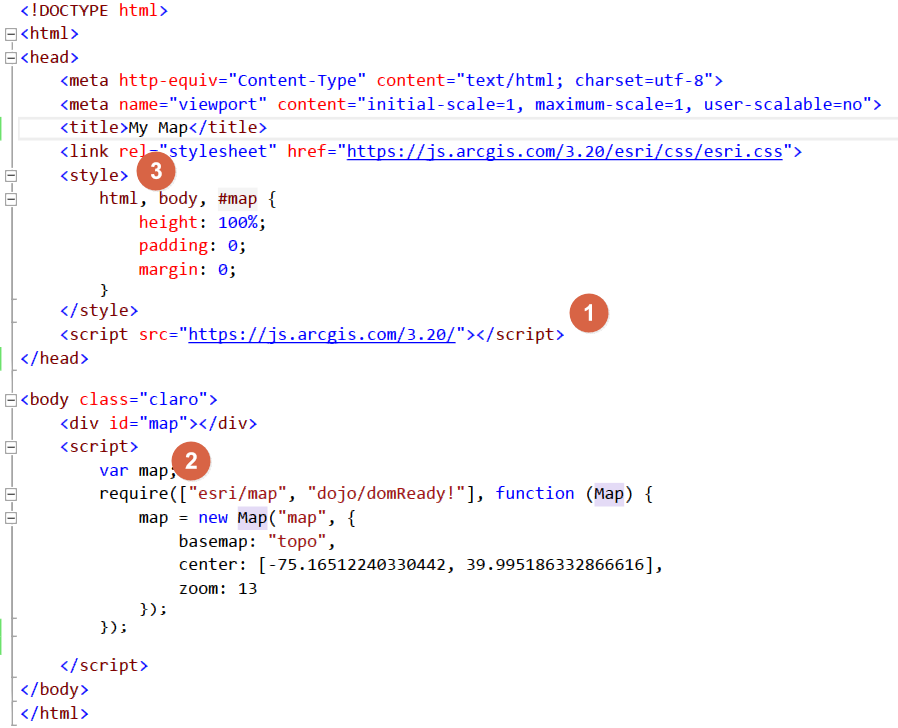
Code to Create a Basic Webmap
There are three primary components to a basic webmap using the ArcGIS API:
- Referencing the ArcGIS API, this line essentially attaches your code to all of the functionality that has been pre-programmed and designed by ESRI.
- Create the map HTML element (above 2). This creates a div element in the HTML page that will be fill with the map content. Below 2, Initializing the function that creates the map. This is a Javascript function that actually creates the map seen in the div element. You can set properties in this function, such as the basemap (more can be found here), an array containing the default map center, and default zoom level.
- Lastly, setting the CSS style to take up space in the browser window. You don’t have to use 100%, but the body / map must use some portion of the window in order for you to see it.
Opening the Index.html file by either running it from your code editor, or opening it from the file explorer will allow you to preview the map you have created.

A Basic Webmap